
The next deck profile is my Skull Warrior deck. It maybe a little unexpected but bear with me as I explain it and hopefully it makes more sense.
Also, as a heads up, if you're looking for a deck profile that is completely thematically Skull Warrior cards, this deck won't be it. Skull Warriors have been under supported so much that this deck is going to have a little bit of Electrodeity, a little bit of Ninjas and heck, even a few generic cards.
Again, feel free to watch my YouTube video below of me explaining the deck as well if you feel like it. It's the exact same deck just in video format:
Buddy: Freak-Wrist Beast Lord, Ziun
4x Evil in Heart, Yamigitsune "Re:B"
Main Deck
The strategy for this deck is to get Freak-Wrist Beast Lord, Ziun, Evil in Heart, Yamigitsune "Re:B" on the field. Then, if you're feeling more defensive (such as it being turn 0), have Nanomachine Ninja, Tsukikage "Re:B" on the side or if you're feeling offensive, have Shutting out the World, Yoroinezumi on the field instead of Tsukikage. Then, you can play the impact monster Yamigitsune, "White Fire, Shigaisoshi" to try to finish off the opponent with one more Ziun attack. So, let's do a run down of the cards I chose.
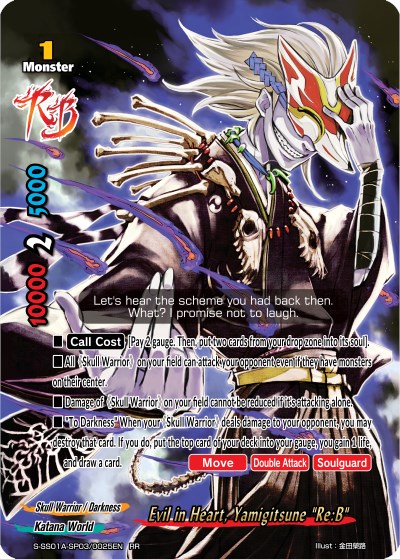
Evil in Heart, Yamigitsune "Re:B" - The main guy of the deck that makes the deck work even without Ziun on the field. He costs 2 gauge but because of how his call cost is phrased, you can turn right around and use those 2 gauge cards for Yamigitsune's soul. He has move, which is kind of pointless, double attack and soulguard.
Yamigitsune's "To Darkness" skill allows you to destroy your Skull Warrior when they deal damage and allow you to charge, draw and gain a life. The real important skill is that Yamigitsune gives all Skull Warriors shadow dive. This is what makes Ziun's huge crit such a scary prospect to the opponent.
Shutting out the World, Yoroinezumi - Used to give more critical to Yami and Ziun a long with being a gauge ramp card. Even if Yoroinezumi is just called to gain 2 gauge and get called over, I think it's worth it. Also, keep in mind the gauge increase effect is not once per turn so you could call a couple a turn if need be.
Humanoid Beast, Yaejako - This might seem like a strange card out of no where but there's a few reasons. First, you can destroy other cards that you don't want on the field anymore, like Yoroinezumi, to recoup a card from deck and gain a life. Also, you can destroy Re:B Yami when he has a soul or two to draw cards and gain life without losing Re:B Yami on the field. This destruction effect is not once per turn either so it's good cycling. Plus, if you destroy 2 Skull Warriors in your turn with Yaejako, you can use Demon Way, Arakuyou to pay a gauge and draw 3 more cards.

Evil Ocular Arts, Yamigitsune - The size 1 resurrection monster for the deck. I dont run Return to the Underworld or Odd Ritual, Skull Festival because if I want to resurrect Re:B Yamigitsune, he won't have any souls because the set spells ignore the call costs. Evil Ocular Arts, Yamigitsune still requires the call cost to be paid. Also, you can use Evil Ocular Arts, Yamigitsune to resurrect Yaejako and then just destroy Evil Ocular Arts, Yamigitsune for a free cycle.
Nanomachine Ninja, Tsukikage "Re:B" - Super nice, consistency card for the whole deck. Literally all the size 1 Katana World monsters in the deck can be searched by Tsukikage. Also, the discard for grabbing two cards isn't even a downside for the deck. You can just grab one card you want in hand and another you want in drop then, because you grabbed two cards, just put the one you want in the drop into the drop. Also, by searching the deck, it allows any Weaver of Dream and Fate, Mikos at the bottom of the deck to be shuffled back into the deck to potentially be used again later.
Yamigitsune, "White Fire, Shigaisoshi" - The impact monster for the deck. I have it as a 1 of because you don't want to draw the card during turn 0. Also, it's searchable by Nanomachine Ninja, Tsukikage "Re:B" so it's still very easy to grab it from the deck. If you don't feel comfortable with only 1 copy, you can play 2 copies but I don't think you should play 3+ copies. It'll start to clog up your starting hand.
Guardian Electrobeast, Goryou - Just a consistency card. Also, if one of the cards is Weaver of Dream and Fate, Miko, you don't add her to your hand. You let her go to the drop and grab some other card and in practicality, you really grabbed 2 cards because Miko is activatable in the drop. Another honorable mention card is Banquet for the Unrighteous if you can't find Goryous. The only issue I have with it is you can only grab monsters which, usually you'll want in the drop anyways.
Freak-Wrist Beast Lord, Ziun - The big man on campus. The big Kahuna. Ziun is size 3 but he reduces in size for each other originally size 1 Skull Warrior on the field so he'll shrink down to a size 1 himself. Also, for each originally size 1 Skull Warrior on the field, he gets 3,000 power and 1 critical so, he can get as big as 12,000 power and 5 critical.
Add one copy of Yoroinezumi on the field and now he has 6 critical. Sure, you may be able to have 2 Yoroinezumi on the field and Ziun for him to have 7 critical but then you lose the more important shadow dive. Also, when Yamigitsune, "White Fire, Shigaisoshi" is impact called, you re-stand Ziun to have him Shadow dive again for 5 more damage.
Demon Way, Arakuyou - The draw spell for Skull Warriors. I run it at 4 because you can cast it once during your turn and then once during the opponent's turn. The requirement for two Skull Warriors to be destroyed may seem like a hard task at first but there's several ways to easily achieve this:
- Re:B Yami's "To Darkness" skill triggering twice
- Call two Humanoid Beast, Yaejako and destroy two Skull Warriors

- Yamigitsune, "White Fire, Shigaisoshi"'s call cost counts as a destruction so, if you were only able to get 1 other destruction during your main or battle phase and his impact call is the second Skull Warrior destruction, boom, you can cast Demon Way, Arakuyou during the final phase.
Hiding Oni - Another alternative draw spell. You can take a soul out of Evil in Heart, Yamigitsune "Re:B" or Freak-Wrist Beast Lord, Ziun to gain a gauge and draw 2.
Demon Way, Sakurafubuki - Best spell null in the game. Sadly, it's limited to 1.
Recover Veil - It's a good gauge gain spell at counter speed so you could keep impact Yami hidden until final phase. It can also be used as an attack null. Also, the first ability that protects your hand is just icing on the cake. Not a lot of decks have discard abilities but at least you know you're safe from them.
Buddy Block! - Some decks can attack so much that Tsukikage's replacement skill, Mikos and Recover Veils just aren't enough to stop the opponent so you just need to play this to stop the opponent's battle phase.
Future Card Buddyfight - This card is to make Ziun easier to get in hand. That's why Ziun is buddy. Without Future Card Buddyfight, it's a little too random for my liking to consistently get Ziun in hand. Even with all the draw cards and Goryou, sometimes I would get through almost half my deck and still not see a Ziun so Future Card Buddyfight fixed that issue for me. Also, the 2 gauge is just really nice.
Sideboard
Before I go into my sideboard cards, I just want to say that Skull Warriors have a lot of flexibility in what sideboard cards they can use because unlike a deck like Ninjas and Ninja Arts, they aren't beholden to Demon Way spells nearly as bad. So, don't take my side deck as gospel because it's really not amazing.

Loyalty - Some decks like to call a bunch of monsters for set up before getting their real board going. So, Loyalty can make the opponent have a less than ideal board for a turn. Making it easier to win the game.
Master Clown, Dark Fox - I don't think its very useful anymore but if you come across a deck that has a lot of souls and still has minimal anti-destruction or you hate a certain soul gives a certain buff to your opponent's monster, you could use this to still get rid of monsters. It also can leave your opponent with an ultimatum. Do I let my opponent hit me with a Skull Warrior so they can gauge, draw and life with Yami Re:B on the field or, do I stop the attack and let my monster get destroyed by Master Clown, Dark Fox?
Strength Beckoner, Kotenso - Just a quick FYI, the card's official name is Strength Beckoner, Kotenso. It's promo, first print version was named Strength Summoner, Kotenso. It was just an error in the printing. This is another card that the +2,000 power hasn't aged well but, if you need to shadow dive against a high defense Hero World deck, you can use this to help get over it. This could honestly be replaced with something else as well.
No comments:
Post a Comment