Saturday, February 11, 2017

Current Skull Warrior Deck Profile (2/11/2017)

This post is sort of a continuation of my last post where I was comparing Ninja Blade, Chirizakura with Fiendish Blade, Urahonekui. If you didn't see that post, click here to read more!

I'm not a huge fan of deck profiles because they don't teach people how to make decks and experiment for themselves but I figured this was over due and I promised it in my last post.

So let's get into the list:

Sorry for the light to the right :(
Buddy: Undying, Benishojo

Size 1:
4x Undying, Benishojo
4x Evil in Heart, Yamigitsune
3x Demon Kid, Hiunmaru
3x Godly-Speed, Natsubame
3x Treachery, Jakikarasu
3x Yamigitsune, "White Fire Shigaisoshi!"

Size 2: None

Size 3: None

Items:
4x Ninja Blade, Chirizakura

Spells:
4x Return to the Underworld
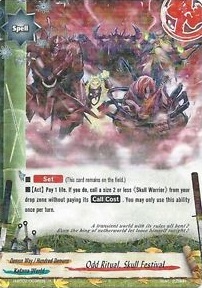
3x Odd Ritual, Skull Festival
4x Clear Serenity
3x Demon Way, Jugonrensa
4x Demon Way, Oborogenbu
4x Demon Way, Kasumienran
4x Demon Way, Arakuyou

Well first thing's first, the deck only has 20 monsters.  I have a hard time finding more Skull Warriors to put in and the ones I have in are the better available Skull Warriors. I don't run Snake Princess, Setsuna because half of my Skull Warriors have call cost and that just isn't efficient. If she didn't require call cost to be paid, I would more than likely play her. I guess you could try to make her more worthwhile by replacing Treachery, Jakikarasu with Diversion Troublemaker, Bakemujina but I don't like having 4000 power between two monsters on the field. Plus, she's not a permanent solution to resurrecting your monsters every turn.
Good buddy material here

The overall plan is to equip Ninja Blade, Chirizakura, call Treachery, Jakikarsu off to the left side, a self-destructing monster to the center and either another self-destructing monster or a Yamigitsune card to the right. The order of attacks can vary depending on your opponent's field but after your center monster attacks, sacrifice him to attack with Ninja Blade Chirizakura. Then, during final phase, kill the non-Jakikarasu monster on the side and call the impact Yamigitsune.  If you only have self-destructing monsters on the field when you call impact Yamigitsune during the final phase, you can call him to the center if you need some more defense. Then, you can call them all back with the Demon Way set spells.

I'm going to replace Evil in Heart, Yamigitsune with the discard Yamigitsune when he comes out. Yamigtisune or Benishojo could be the buddy in this deck.  I like Benishojo more since he's easier to call back and I'm replacing Yamigitsune later. Plus, Benishojo as buddy acts as a reverse Demon Kid, Hiunmaru the first time you call him from drop.

I originally had Revelation Tactician, Keiganryu in the deck but when I had him, the deck was a little too gauge heavy. At one point, I did have Retainer of the Demonic Dragon, Resurrected Dragon Bones in the deck with Keiganryu but without Keiganryu, his size 1 counterpart is pointless. Also, Keiganryu can't be resurrected with the set spells so any other way to call him back is super gauge expensive.

You might be concerned about the consistency of drawing Ninja Blade, Chirizakura but you can get the weapon pretty consistently with all the draw monsters and spells in the deck. Same thing with the set spells. Cat Shadow, Aoihime isn't really needed and the fact that she's size 2 messes with the formation you're going for.

Other monster cards I considered for the deck:
Blood Knife, Kimensai
Diversion Troublemaker, Bakemujina
Kalavinka, Uguisukomachi
Lightning Speed, Tsukiusagi
Strength Summoner, Kotenso

Other spell cards I considered for the deck:
Art of Body Replacement
Demon Way, Geppakugiri
Double Loss
Hundred Demons' Tome of Judgement
Ninja Arts, Snake Gaze

I don't plan on doing deck profiles often but I figured it was justified trying to show people how to work with Ninja Blade, Chirizakura. I'm interested in the Assassination Demons that are being shown but I hope Bushiroad keeps supporting Skull Warriors even with this new archetype and don't think they can just replace them. I'll make a post once we know more about them other than the fact that they have a new red text ability called Raid.

Wednesday, February 8, 2017

Weapon Comparison: Urahonekui vs Chirizakura

So I decided to write and compare these two weapons because these two weapons have three things in common:

1. They don't directly coincide with Japanese Blades/Blade Beasts decks since neither of them have that attributes.

2. They both want to be able to attack even if you called a monster to the center during the main phase.

3. The cards are very open to be generally used in any deck.

So, I wanted to compare each one and see if they're currently viable in Ninja, Skull Warrior or Water decks.  Let's start with Fiendish Blade, Urahonekui and what it does.

Urahonekui translates to backbone eater.
That's pretty dark.
Fiendish Blade, Urahonekui
Power: 3000
Critical: 2
Equip Cost: Pay 1 gauge & pay 1 life
This card can attack even if there is a monster in your center

Urahonekui has the same base stats as the vanilla Katana World weapon Ninja Blade, Kurogachi. So then, we can assume the ability to attack through center has a value of 1 (.5 paid through gauge and .5 paid through life). This is understandable since Bushiroad wants the game to have a risk vs. reward aspect.  They want players to have the risk of being directly attacked for having a weapon equipped and being more aggressive. Being able to attack while having a monster in the center makes the player too safe and to justify this, they make the player use up resources. 

One thing this weapon doesn't help that normal weapons innately deal with is that any deck that runs this card is still susceptible to penetrate. So you could expend resources to use this card and still come behind if your opponent pentrates your center monster.

So let's look at how it can work in the Ninjas/Skull Warriors/Water.

Ninjas: I've seen some people use this weapon which is understandable. You can attack when you have size 1s on the field and many decks (including mine) run INV Second Omni Demon Lord, Death Asmodai so you can (hopefully) discard Ghoul Deity, Gojinmaru and freely call him. It also helps get down to 5 life so you can use Raiton, Art of Stored Electricity.
Is this what they called shock therapy?

I don't run this weapon personally in my deck. Water Slash Sword, Murasame works fine for me and helps control reducing my life a long with being able to discard them for the Tsukikage & Byakuya "Chaotic Nano Art of Body Duplication!" impact monster.  It's up to the person's play style and each weapon is pretty interchangeable.

I find the card slightly inefficient in Ninjas just because Gojinmaru has move and so the "attack through center" ability becomes a useless skill.

Skull Warriors: I think Urahonekui was meant to be used in Skull Warriors.  Classic size 1 Skull Warriors always have Evil in Heart, Yamigitsune in the center so this compliments the line up and lets the deck be a little more aggressive.

I have a couple issues with the weapon in Skull Warriors though. The first issue with the size 1 line up uses gauge and life to recall their monsters and so the resource usage is pretty heavy.  Skull Warriors don't have a lot of free resources with the constant recalling of their monsters with the set spells so sometimes I feel like you hurt yourself more with this card than it helps

The second issue is the size 1 Skull Warriors suffer from having average power where the deck requires link attacks to attack big monsters and this weapon doesn't help.  I mean sure, it can be used in a link attack for the extra 3000 power but that isn't a lot.

Water:  Sadly, there isn't much to say. The weapon could probably do well in this deck since Water is about having good attack and defense on the monsters with the water set spell and having a closed center. Unfortunately though, Water is so under supported, I shouldn't consider it an archetype anymore. Maybe we can get something in Season 4 but it was a cute idea for the Break to the Future set and didn't get much farther than that.


So let's move on to Ninja Blade, Chirizakura

Which weapon is the actual ninja blade?
Ninja Blade, Chirizakura
Power: 2000
Critical: 2
[Counter][Act] During your attack phase, destroy a monster on your field. If you do, for this turn, this card gets power +5000!

There's a lot going on with this card so I'll keep this as clear and understandable as possible.

So let's start with its stats. It has 1000 less than Ninja Blade, Kurogachi. The ability is interesting. Destroying one monster makes this card a wash. Its attack would become 7000.  You could argue that then, the base stats could be 3000 and the destruction would be 4000. It's a reduction in initial power but a boost in power with each monster you sacrifice. This is the same concept with Tempest, Garo-oh that I talked about and why I liked Garo-oh over Gale Conflagration, Amakujaku

If you're going to sacrifice any monster, it would be the center monster. You can attack with the monster in the center, destroy it and then attack with the weapon. This card is actually amazing. You're losing nothing because you get to attack with the center monster and then you can still attack with the weapon at 7000 power which Skull Warriors have a hard time hitting without using Strength Summoner Kotenso or link attacking.

Also, this ability isn't once per turn. After one destruction, it hits that quality 7000 power. After two, it hits 12,000 power.  You can link attack with two monster to try to kill a 10k defense monster like the Asmodai Omni Lords.  If that gets stopped, kill them both and try again with just a single attack.

Also, unlike Urahonekui, this card is free to play.  Sure you need to sacrifice a monster in the center to attack with the weapon (which would be -1 in resources) to get this card up to its base potential but the point of the center monster is already done if you destroy the monster after battle. This card is more bang for your buck without essentially losing anything.

Just like every other weapon other than Urahonekui, this weapon does cover the penetrate issue I mentioned above.

So let's look at Ninjas/Skull Warriors/Water

Ninjas: I've never seen Ninjas run this weapon and to be fair, they don't really need to. Gojinmaru is about shadow diving so excessive power doesn't accomplish this goal. Currently, it's about keeping Gojinmaru on the field for as long as possible to shadow dive your opponent as much as possible.

Skull Warriors: This weapon is amazing.  Absolutely amazing for Skull Warriors.  It's a hidden gem that I feel like no one has really looked into.  I'm not saying that no one has tried it with Skull Warriors but I find this weapon 100% needed for Skull Warriors to get that extra bit of damage to end the game or get a big weapon to bring down a 10k+ defense monster.
He's got your back. Or is it your front?

If you're worried about your center being open, don't worry.  First of all, your defense spells work fine with open center. You have Demon Way, Oborogenbu and Demon Way, Kasumienran which fits perfectly with the play style. If you're still worried about leaving your center open though, run a mover. Either Diversion Troublemaker, Bakemujina or Treachery, Jakikarsu will do the job.  Call them off to the side during your turn. I like Jakikarasu more since you get better stats and essentially a vanilla stat monster with free move if you use one of the Demon Way set spells to call him back.

It has so many synergies with Skull Warrior spells as well. Kill your own monster and proc any spell that can be played after a monster is destroyed. Demon Way, Geppakugiri, Double Loss and Water Ploy, Kyokusuinoen all work. The one that works the best though is Demon Way, Arakyou. Draw 3 after the monsters have attacked and you blow atleast 2 of them up. Your opponent doesn't have to destroy your own monsters to proc these and that's what makes these cards so good with this weapon. It's controlled destruction to get even more bang for your buck from your Skull Warriors.

There is literally no reason to not run this deck in Skull Warriors. Lets count all the things we get for calling self-destructing monsters and killing them ourselves. For 1 gauge/life per monster (we're assuming your using the Demon Way set spells) and calling a full size 1 field, you get:

1. The monster's attack.

2. Any call from drop effects (e.g. Godly-Speed, Natsubame/Demon Kid, Hiunmaru on enter abilities).

3. +5000 power onto the Weapon for their destruction which in turn means...

4. High quality 7k/12k/17k attack weapon.

5. Bait counter destruction during battle.  Kill your own monster when your opponent uses a counter spell to destroy your Skull Warriors. You get the last say in their deaths and they essentially waste a spell.

6. Proc on-destruction spells. My personal favorite is Demon Way, Arakyou. It's for pretty much free and you start the cycle all over again.

7. You don't get penetrated. You have an open center or if you have a mover on the field and they call a monster with penetrate, don't move the monster to center. Force your opponent to choose to attack your monster or you.

When you're killing monsters that are already doomed to die at the end of the turn, it makes it a trivial downside that you have to destroy your own monsters with the weapon. This play style is aggressive. It can essentially get 4 consistent attacks a turn every time. 3 monsters on the field and the weapon attacks for high numbers. That's a lot of attacks your opponent has to deal with and I doubt they can keep up with their defenses and it gets resurrected with the set spells.

The new discard Yamigitsune will make this deck even better once it comes out.  Think about it. Your opponent will use his nullify/counter destruction cards on your attacks.  Once you break through his defenses, attack him directly and make him/her start throwing his hand away.

What's even better is your overall level of defense isn't much less than before.  With the movers I mentioned earlier, you still get that closed 1000 defense center. Just like before.

Sorry for the wall of text on this part but there was a lot to talk about with this weapon.  I seriously hope Skull Warrior players have a new view on this card start trying out in their decks. I'm going to post a deck profile of my current Skull Warrior deck soon with this weapon next to give everyone an idea of how to build the deck.

Water: The weapon is not even useful for Water.  There's no water monster with move that syngergizes well. Again just too under supported to be super useful.  It has some synergy with Water Ploy, Kyokusuinoen like I mentioned before but the point of Water is to have a high defense monster in the center and to destroy the monster just to put it back to your hand doesn't keep your defense up. Of course Water has always had close relations with Skull Warriors so who knows?  I honestly might be missing something but until Water gets more support, I've put them on the back burner for now.

As you can probably tell, the main pointers I wanted to cover with the two weapons were for Skull Warriors. Katana World has had their weapons freely usable for any archetype but the Japanese Blade weapons have pretty much made their home with Blade Beasts so I wanted to look at these non-Japenese Blade weapons and analyse their uses for the rest of the Archetypes.

I hope this article was a little eye opening and have people try different play styles with the above mentioned weapons. Especially Ninja Blade, Chirizakura. I'll be posting my Skull Warrior deck with the weapon next to help give you guys an idea of what their play style is better.


Saturday, January 21, 2017

Monster Comparison: Garo-oh vs. Amakujaku

Monster Comparison: Garo-oh vs. Amakujaku


I decided to make this thread because of a thought process I went through. With the current plethora of skull warriors that are available, I was trying to decide if I should run size 2's in the deck and resurrect them with Odd Ritual, Skull Festival. The thought process came about trying to think of a way to spend less life and gauge on calling a full field but still be able to get 3 attacks in one turn as if there were 3 size 1's on the field. The end result actually made me respect Bushiroad's Buddyfight R&D team.

So obviously my first thought was size 2's that had double attack. Currently, the only two double attacking Skull Warriors are Tempest, Garo-oh and Gale Conflagration, Amakujaku. By using Odd Ritual, Skull Festival to resurrect one of these cards, I could have a monster with double attack and not need as many set spells to create a full attack set up.

Depending on how well you know how resources and base stats work in this game, this might get quite deep so I'll do my best to lay it out as simple as possible. Before we get too deep into this, let's lay out each monster's stats and abilities starting with Tempest, Garo-oh and talk about them:

Is it weird that I own more
SP Garo-oh cards than RR cards? :/

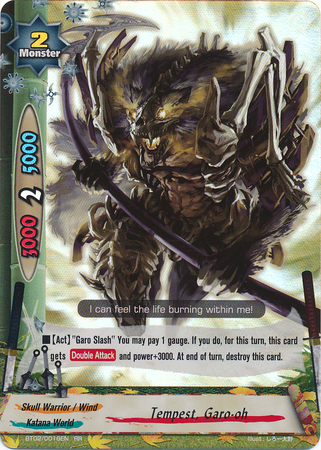
Name: Tempest, Garo-oh
Size: 2
Attack: 3000
Critical: 2
Defense: 5000
[Act]"Garo Slash" You may pay 1 gauge. If you do, for this turn, this card gets Double Attack and power +3000. At the end of turn, destroy this card

In total base stats, Garo-oh has 14,000. That's 2,000 below vanilla stats so what gives? Well his ability is very nice. By paying 1 gauge, he gains +3000 attack and double attack but dies at the end of the turn. The nice thing about this ability is it isn't limited to once per turn so while he won't get multiple double attacks, his attack will keep increasing to help deal with big walls.

The self-destruction is balanced out by the double attack so we can consider that a wash and put it to the back burner for now. No matter how much gauge you pay, he will always have static double attack and static self-destruction. What's strange though is 1 gauge doesn't equate to 3,000 stats.  It actually equates to 2,000 so what's the deal with that?

Well let's take this one step at a time by looking at his stats every time Garo-oh is "fed" a gauge for his ability:

Base stats (0 gauge): 14,000. (3,000 attack)
1 gauge: 17,000 (6,000 attack)
2 gauge: 20,000 (9,000 attack)
3 gauge: 23,000 (12,000 attack)
4 gauge: 26,000 (15,000 attack)
5 gauge: 29,000 (18,000 attack)
6 gauge: 32,000 (21,000 attack)

Now, what if Garo-oh started with vanilla base stats (5,000/2/5,000) and had his ability but instead he got the appropriately equated 2,000 stats per gauge when you used his ability?  Well, let's lay it out:

Base stats (0 gauge): 16,000. (5,000 attack)
1 gauge: 18,000 (7,000 attack)
2 gauge: 20,000 (9,000 attack)
3 gauge: 22,000 (11,000 attack)
4 gauge: 24,000 (13,000 attack)
5 gauge: 26,000 (16,000 attack)
6 gauge: 28,000 (19,000 attack)

By comparing how it is to how it could be if everything was accurately paid, you can see why Bushi made Garo-oh the way he is. First, if Garo-oh had vanilla 5000/2/5000 stats, Bushi couldn't make a clean 5000/2/5000 vanilla Skull Warrior because Garo-oh would be straight up better and there would be no deeper strategy.

Bushi could made a 5000/2/5000 vanilla skull warrior now and you could argue that each has its pros and cons now. Do I go with the 3000/2/5000 that by feeding gauge gets better or do I get the 5000/2/5000 monster that can't get bigger but he's better at face value?

There has to be a penalty for having the ability to buff up your stats multiple times. So Bushi starts Garo-oh lower than normal but in exchange, can actually get more bang for your buck the more you feed him gauge. If Garo-oh started at 5000/2/5000, and gained 2,000 attack per gauge, it would just be a linear, static scaling. The more you invest in him, the more he can take bigger monsters down and not have to link attack to achieve it. The rule is for every 2 gauge you pay, you get back 3 gauge worth of power. Paying 4 gauge is the equivalent power of paying 6 gauge.

He still has some downsides. The main one to note is that if you resurrect him with Odd Ritual, Skull Festival, you still have to pay gauge to give him his double attack and power and what is 1 gauge (through his skill) and 1 life (through Odd Ritual)?  Oh yeah, just as if you used 1 Return and 1 Odd Ritual to call 2 Demon Kid, Hiunmaru. But he's a single size 2 monster. So if your opponent has almost any counter destruction spell (Pillar of FireDeath Grip, etc.) it pretty much ruins your whole turn because you invested (in my opinion) too many eggs in one basket.

Now let's look at Gale Conflagration, Amakujaku:

I still don't know what I'm looking at with this guy

Name: Gale Conflagration, Amakujaku
Size: 2
Attack: 7000
Critical: 2
Defense: 3000
Call Cost [Pay 1 gauge]
At the end of turn, destroy this card
[Double Attack]

Unlike Garo-oh, Amakujaku is more straightforward. His stats are actually vanilla (7000+6000+3000 = 16,000) but he has a -.5 value because of the gauge cost. The self-destruction should pay for his double attack but Bushi probably didn't want him to be free (without having Goshi Goma on the field) which is understandable. Especially since his attack hits a quality 7000 attack number. Something Garo-oh can't achieve without investing 2+ gauge into him.

Why does he have that 1 gauge call cost? Well, if Amakujaku was free to call, you would be basically "discarding" Amakujaku to either deal 4 damage to your opponent, destroying 2 monsters on the field or destroy a monster then deal 2 damage. Any combination of those would make him give you +1 in advantage.

Since Amakujaku costs a gauge, now in a best case scenario, Amakujaku can gain you +.5 advantage. Bushi tends to give +.5 advantage at most through one card. This makes the card actually have solid potential. Clearing 7000 walls can be a chore for Skull Warriors so he helps bust down tanks.

One last benefit to note is that unlike Garo-oh, you can pay 1 life to call him back with Odd Ritual and not have to pay another gauge to give him his double attack and he still starts out with 7000 power.

The downside of this is Amakujaku can die to literally every form of counter removal in the game and unlike Garo-oh, Amakujaku can die to Hidden Crossbow

-End Rant-

*phew* So now that I put that all out (and probably scared half of you away), you're probably all wondering which one is better and which one I personally like more. In terms of which one is better, it actually... depends. It depends on the situation and what's going on in the current game. Neither one is actually straight better than the other.

Garo-oh has more flexibility.  You can leave him in the center turn 1 as a decent wall with 2 crit and not use his ability at all or you can be insane and pump 6 gauge into him (if you have that much) to make him a terrifying 21,000 attack and laugh at your opponent as you do a single attack against Miseria's 20,000 defense. He's a flex option. Something not a lot of cards in Buddyfight are.

Amakujaku is a one trick pony.  He is better than Garo-oh when you only put 1 gauge into Garo-oh's ability but he can't cover your center with decent defense during turn 1 and he can't scale up to take down bigger walls. He's good at what he does and that's it. Period.

In terms of what I personally like, I actually like Garo-oh more. Mainly because his SP artwork is awesome and strategically, he gives you options on what you're trying to do. Sadly, I came to the conclusion that I don't like either in a deck. I'd rather spread my threats out to 3 size 1 (or play Keiganryu and call two other size 1's) than commit my offense to only 1 double attacking size 2 monster.

Size 2 Skull Warriors are actually in a pretty sad place. Some are too situational (such as Flash Strike Yamaihebi and Outlander, Bokunryu) and they can be destroyed by pretty much everything. Because Keiganryu and the Yamigitsune impact exists for Skull Warriors, Size 1's have better quality right now.


Thursday, January 5, 2017

The New Yamigitsune and What it means for Skull Warriors

The New Yamigitsune and What it means for Skull Warriors


So I'm freaking out like a little girl right now.  A new Yamigitsune card has been revealed and it is amazing for several reasons.  First though, lets take a look at it. This is everything that is on Buddyspoiler.com when I write this.  His name is more than likely going to be different and I wouldn't doubt the effect name will change.


Name: Companion Katana of Magatsu, Yamigitsune
Size: 1
Attribute: Skull Warrior, Darkness
Attack: 5000
Critial: 2
Defense: 1000
[Call Cost] [Pay 1 gauge]
"Blue Fire Corpse Fire" When a <<Skull Warrior>> on your field deals damage, you may destroy that card. If you do, your opponent chooses a card from his or her hand, and discards it.

So I'll list the reasons why this card is even more amazing than Evil in Heart, Yamigitsune!

1. So right off the bat, people are going to notice that he is the opposite to Evil in Heart, Yamigitsune.  This one discards instead of draws.  Normally, this isn't a big deal.  Instead of you +1ing from "To Darkness" you're forcing your opponent to -1. This technically isn't anymore or less significant. This "better" though because it can really hinder your opponent.  If the opponent doesn't have any nullifies and have a whole hand full of aggro for the next turn, this card will kill 2-3 (depending on how many skull warriors you use this on) cards in your opponent's hand which could completely cripple their next turn's full swing to win. While you can revive your monsters and keep cutting their hand down.

2.  Unlike Boy Transformation, Yamigitsune, this Yamigitsune can activate multiple times a turn. This is appropriate since you can't rush to victory on making your opponent discard (though it's pretty close).

3. This new Yamigitsune destroys your monsters.  Evil in Heart, Yamigitsune "put" them to the drop. Unlike Evil in Heart, Yamigitsune, the new Yamigitsune allows you to proc Demon Way, Geppakugiri to get field control but that's just the tip of the iceberg. 

Remember how I said that it mathematically doesn't make any difference that your opponent discards instead of you drawing? Yeah, one card changes that rule. You can still enjoy the full benefits of drawing because of one card: Demon Way, Arakyou. You can force your opponent to discard 2-3 cards and in the mean time, you can happily draw 3 for yourself because it's destroying your skull warriors.  Not "putting" them to the drop.  

Another scary card that might make a "revival" (see what I did there?) is Thunderclap, Goraiko.  This card will force your opponent to take 1 damage and discard a card. And this is abusable once a turn with Odd Ritual, Skull Festival. Then, you can still call a whole field to keep forcing the discard.

4. Another old card finally gets some revival and use. The original Demon Way Impact. Demon Way Karakurenai.  I never understood Bushi's logic with this impact when it was released.  It was counter intuitive to how Skull Warriors were played.  People played closed center with Yami because you can just revive him and the 2 cards in your opponent's hand requirement seemed trivial for Skull Warriors. It made the impact very lack luster and have no real use.  But now that you can force your opponent to discard through damage and there is Ninja Blade, Chirizakura to always have an open center, this card has become super useful to OTK your opponent.

I'm sure there's other cool combos I didn't think of but this was my initial thoughts on the card and I'm pumped for this guy! I welcome him with open arms.

So my final verdict is 10/10 run 4 in deck.  Buddy material


Saturday, October 22, 2016

Common Rulings and Misconceptions

So this wasn't meant to be the next post.  I actually wanted to talk about what different effects are worth in the game and then about sideboard but after browsing through the NA Buddyfight group on Facebook, I realize there are somethings in this card game that are still confusing to newer people because I see a lot of questions repeatedly asked in the group.

I wanted to post some common rulings and misconceptions here so if people in the future aren't sure about a situation, maybe my post can help.  I plan to expand upon this post in the future when new cards with weirder effects occur. Veterans may already know all of these but who knows.  Maybe you'll learn something new!

Now get these right or Teachmodai
has a backdrop with your name on it.

Ruling #1: Card Effect Names


This is the question that if I got a nickel every time someone asked, I could buy a play set of every card in Buddyfight.

The situation is the confusion between when card effects have names (such as Cyber Analysis on Electron Ninja Shiden) and when that card says "This card's ability only activates once per turn" or "<Skill Name> only activates once per turn".

This combination of text can be separated into three unique situations

Situation #1: Card has an effect with no name AND at the end, it says "This card's ability can only be used once per turn".  
Example of this card:  Return to the Underworld

Ruling:  When a card like Return to the Underworld is played, the once per turn reference is that *points at the card* physical card on the field.  This doesn't apply to all Return to the Underworld set spells on the field.  This means you can activate multiples of that set spell on the field without an issue.

Situation #2: Card has an effect name AND says "This card's ability can only be used once per turn".
Example of this card: Electron Ninja, Shiden

Ruling: This ruling is the same as above even though it has a name.  It's this physical card's ability that can only be used once per turn.  That means that you can call multiple Shidens and use each of their abilities.

Situation #3: Card has an effect name AND says "<Effect name> can only be used once per turn".
Example of this card: Red-eyed Succubus

Ruling: This ruling is different than the above two.  The once per turn clause is going deeper into the card than just the physical card.  It's pointing to the actual effect name.  So you can't activate multiple cards with this effect because that unique effect with that name has been used.

I chose the Succubus and Shiden for the later examples because both card's effects are the same but because the once per turn clause is different, it means Succubus's effect can only be used once per turn while Shiden can keep drawing you a fat hand if you keep playing him.


Ruling #2: Boy Transformation, Yamigitsune's ability

You're so misunderstood little boy
This card has caused it's fair share of misplays for newer players of Skull Warriors.  Let's copy and paste his ability here for the sake of easier analysis:

"Sense Synchronization" When a 《Skull Warriormonster on your field deals damage to your opponent, you may put that monster from your field into your drop zone. If you do, deal damage to your opponent equal to that card's size! "Sense Synchronization" only activates once per turn.

People are treating his ability as if it's the exact same as Evil in Heart, Yamigitsune's ability.  While it's similar, it's still different and it's a minor thing that matters a lot.

Boy Yami's ability activates as soon as damage is dealt to your opponent. It doesn't matter whether you want to actually send the Skull Warrior to the drop or not, his ability activates.

"But Billeh" you may say "The same thing happens with normal Yamigitsune and I can choose when I want to use it".  You are correct random stranger in my head.  But there is a major difference.

Since Boy Yami states "Sense Synchronization can only activates once per turn, you can choose not to send a card to the drop and that's fine.  But Sense Synchronize already activated and as such, you can't send another Skull Warrior to the drop later on in the turn.

A common example is this:
>You play Boy Yami
>You play Thunderclap, Goraiko and deal the 1 damage upon entering the field.
>Boy Yami's ability activates now.  You can choose to send Thunderclap to the drop or not.  If you do, you deal 2 damage with Boy Yami's ability.  If you don't, the ability still activated and can't be used again.  Even with another Boy on the field because it's a named ability that's only once per turn.

You cannot deal 1 entrance damage, attack with Thunderclap and then try to Sense Synchronize for 2. Sense Synchronize already activated.

In other words, if you don't his ability, you lose it.


Ruling #3: Counterattack and post-battle effects

Ziun is number one.
Therefore Skull Warriors are number one.


I haven't seen anyone have this question but this happened locally and we were confused as far as what happens until we looked deeper at the rules.  The situation is as follows:

>Boy Yami and normal Ziun are on the field.
>Star Guardian, Jackknife is in the center with a soul in him on your opponent's field.
>Ziun attacks Jackknife and the opponent plays Speculight Ring.
>The attack (along with the penetrate) goes through (8k attack vs 8k defence) and deals damage to your opponent.

The  question becomes this: Does counter attack from Jackknife occur before or after Boy Yami's Sense Synchronize activate?

The answer is the counter attack from Jackknife goes off first.

In the rulings, counter attack is still apart of the battle.  There is no play timing yet for Boy Yami's effect to go off.  Your opponent kills Ziun.  Then Boy Yami's effect activates but because Ziun has already left the field due to counterattack, there is no target for Boy Yami's ability and therefore, no additional damage can be dealt AND this also means Boy Yami's effect has activated and can't be used for the rest of the turn.


Ruling #4: Demon Way, Geppakugiri


The rulings behind Demon Way, Geppakugiri even surprised me when I looked it up.  This card has some interesting play timings that not a lot of cards have.

The first ruling with this card is that during your opponents battle, you may cast as many Geppakugiris that you want from your hand.  Reason being is that when your monster is destroyed, a play timing occurs of monster destruction.  At this point, you can counter and use Geppakugiri.  Then it goes back to the play timing of a monster being destroyed and you can cast another.

The second ruling is that if your opponent destroys your monster during their main phase, you cannot cast Geppakugiri immediately. You have to wait until the next counter timing and here's an example:

Situation:
>It's your opponent's turn and they have a Black Death Dragon, Abygale on their field.
>You have Electron Ninja, Shiden on your field and a Geppakugiri in your hand.
>Your opponent uses Abygale's ability and destroys Shiden.

You do not have a play timing for Geppakugiri after a card's effect resolves during the opponent's main phase but Geppakugiri can be cast as a counter to the first instance of an action taken by your opponent that does not refer to the destruction of that monster.

So if your opponent decides to play, let's say, Abyss Symphony, a counter timing occurs which allow Geppakugiri to be cast and you can kill Abygale.  Unlike the first ruling above, you can only cast one Geppakugiri in this counter timing.

Ruling #5: Art of Explosive Hades Fall

... they all fell down
This one is in regards to when a monster enters the field with an on-enter ability and Hades fall activates at the same time.  Generally speaking, the monster called still gets to use its on-enter ability. The card was successfully called so the ability activates.  Then Hades Fall will activate and destroy the monster.

The only way the on-enter ability can be nullified is if the call itself is nullified with Begone!! or one of the other clones of the card in other worlds.

Also do keep in mind that normal [Act] abilities on monsters (like Shiden) do not get a chance to activate when the monster gets destroyed by Hades Fall.


Ruling #6: Gojinmaru's call cost


This section is about a couple things with Gojinmaru but it can also apply to other cards that have a call cost of putting monsters on the field into the soul of a new, summoned card.

The first question is: "During the counter timing of calling Gojinmaru onto the field, can I cast a Death Grip (or equivalent counter destruction card) to destroy Byakuya or Tsukikage to stop Gojinmaru from entering the field?"

The short answer is no. During the call, the counter timing is after the call cost has been paid.  At this point, Tsukikage and Byakuya are already off the field and in the soul of Gojinmaru.  You can't counter destroy Gojinmaru at this moment either because he isn't on the field yet.

The second question is: "If I cast Begone!! on Gojinmaru, does Byakuya and Tsukikage along with the gauge cost go to the drop?"

That answer is yes.  The call cost was paid so the gauge was paid and the ninja brothers are in Gojinmaru but Gojinmaru's call was nullified so everything goes into the drop.


Ruling #7: Destruction of cards

Pray for your life points

Buddyfight cards rely a lot on wording to determine if certain requirements are fulfilled for something to activate.  Destroying a card is not the same as putting a card to the drop zone. So lets run down a list of some common events that occur in this game related to that:

1. Evil in Heart, Yamigitsune's "To Darkness" puts the card to drop.  So cards like Demon Way, Geppakugiri do not proc off of it.

2. Demon Way, Arukuyou procs off of any destruction of Skull Warriors. Even if you do it.  That makes it very easy to proc.  Especially with Yamigitsune, "White Fire, Shigaisoshi" and Skull Warrior Bones of the Four Birds "Akutenhaba".  The latter allows you to destroy as many Skull Warriors as you want. So if you have three size 1's on the field, don't destroy just one and put the rest to drop for size rule, just destroy them all then you can use Arukuyou to draw three.

3. Putting cards to drop because of call over or size rule do not constitute as destruction.

4.  Calling a card on top of another one like Bal Dragon, "Bal Burst Smasher!!" is not considered destruction either.

Ruling #8: Lifelink


This one is pretty straightforward but I wanted to be clear with everyone on Lifelink. Lifelink is damage.  So any abilities that proc off of taking damage do go off with Lifelink.  Lifelink occurs whenever that creature leaves the field.  Literally whenever.  Obviously there can be cards like Dragon Kid, Ricky who nullify lifelink of Raging Spirits but here are some examples just to lay it out in plain English:

  • Calling over because of size rule
  • Calling over a monster to take its position on the field
  • A monster destroyed by an attack and sent to the drop zone.  Lifelink doesn't activate if the monster destroyed has a soul and Soulguard is used to keep it on the field.
  • Bounced back to hand (e.g. Magical Goodbye)
  • When you put the card with lifelink on the field into the soul of another card, you take the lifelink damage.  The monster is leaving the field to go into the soul of the monster you're calling.  Souls are not on the field. 

An example of this is Billion Knuckle, "Spirit of the Chief!" being called on top of Leadbanger. You will take Leadbanger's lifelink. He left the field to go into Billion Knuckle's soul. Now Ricky can nullify that lifelink damage but if he's not on the field, you're taking it.

Wednesday, October 12, 2016

Resources

Resources

What constitutes a ritual as being odd?

I remember when I was researching Skull Warriors very early on in playing Buddyfight.  The Skull Warrior deck I borrowed to start playing this game only had Return to the Underworld as it's set spell. So when I came across Odd Ritual, Skull Festival, I was ecstatic to find another set spell that resurrected Skull Warriors. After reading the card though, I grew this odd hatred towards the card. Ever since I played Yu-gi-oh as a wee one, I always had this aversion to pay for effects or monsters in the form of the resource that keeps you in the game.  After all, what happens if they rush you out of nowhere and you need the life points to live.  What then?  I would be dead.

It took me way too long to realize how amazing Odd Ritual, Skull Festival actually is and an even sadder amount of time to realize that I could keep using it to resurrect Cat Shadow, Aoihime and keep getting more set spells.  I'm not kidding.  I was playing this game for probably a solid 6 months before I realized it.  

If anything, paying to use abilities and call monsters through life is actually more preferred in Buddyfight and most card games.  Why is that?  I'll get back to that in a while.  First though, let's establish what our resources are in this game.  

Also before I go into anything, I did summarize a lot of the articles about resources from Blaze's articles into this article.  Then I expounded on it a little.  Again, if you want to read more, go here.

The four general resources in the game are the cards in your hand, your gauge, your life, your drop zone and your deck.  These seem pretty obvious so let's go through them and I'll explain them in further detail.


Cards in Hand

This one is pretty obvious.  I mean it's the basis for not only Buddyfight but for practically every card game.  I like to say as a general rule of thumb that if you have no cards in your hand, then you are practically dead.  Think about it.  If you have nothing in your hand, you have no control over the situation and your opponent knows exactly what you have. This makes it very easy for your opponent to know what the best course of action is both psychologically and strategically. You have told your opponent everything.  It doesn't mean that you will lose the game though.

In this game, cards have a resource value of 1. So for example. Drawing a card is a +1.  Placing a card on the field is a -1 from hand but is a +1 to the field so it balances out where you're not losing anything. When a monster goes from the field to the drop zone through battle, that's a -1.


Gauge

Another obvious resource. It's usually used as a payment cost for items, spells and monsters. Gauge is generally considered a resource value of .5.  So when you charge and draw, you're giving yourself +.5 advantage.  By this logic, 2 gauge is equal to 1 card.  Also by this logic, since 1 card in payment cost is 4000, that means that cards with 1 gauge cost have about 2000 more stats or an ability that cost that much. Paying through gauge subtracts your gauge advantage but it tends to translate into something more useful whether it's extra stats or an ability.

Also, gauge has some pros and cons as a resource:

 Pros:
  1. You are able to easily gain one once per turn through charge and draw.
  2. Gauge doesn't tend to be destroyed by effects from your opponent.  It's generally speaking a reliable resource.
  3. Having no gauge doesn't mean you lose the game.  You might ask what I'm talking about here but just roll with that thought for now.
 Cons:
  1. Gauge is usually paid quite a bit between spells, items and monsters and you don't start with a lot.
  2. No gauge means that cards in your hand with gauge costs are useless.
Katana World in general has evolved into a gauge heavy world.  It's partially why Clear Serenity breaks the 1 card = 2 gauge rule and Katana World gets some of the best gauge ramp cards in the whole game.  Between Clear Serenity, Raiton and Cloud Billow, you shouldn't have gauge issues.


Life

Your blood in Buddyfight.  The thing that everyone wants and no one wants to give up. Once you hit 0, you lose the game.  A simple enough concept.    Life is also considered .5 advantage.  This also obviously means that payment through life tends to give you about 2000 more stats or an ability that is valued at 2000 stats.

Just like gauge, life as a resource has its pros and cons too.

 Pros:

  1. Life isn't used as cost as frequently in any world other than Ancient World and even then, it's after the monster dies as Lifelink and not an initial pay cost so a lot of times, you don't actually pay the Lifelink cost.
  2. Most of the time, you can pay the life cost of a card.  Obviously the exception is if you're at 1 life (or two for Sakurafubuki) but more times than not, you have enough life to pay for a card.
 
Cons:

  1. You are not able to easily gain one life per turn.  In fact, most decks are only able to easily gain 1 life and that's through buddy gift but this isn't a consistent way to gain life per game.
  2. Life is very easily lost because your opponent.  It's the whole point of the game.  As such, life is valued more than gauge.
  3. No life means you lose the game.

If you compare the pros and cons, the gauge cons are the life's pros and the life's cons are the gauge's pros.  This is why both resources can be valued at the same amount.  Bushi does tend to value life "slightly" more than gauge though because they have to make it enticing for players to use it as a resource.  

To finish off what I was saying earlier, this is why Odd Ritual, Skull Festival is a better card than Return to the Underworld.  It has the same mathematical payment but you can choose from size 2 or lower instead or size 1 or lower. Obviously the downside of the card is that if you have one life, the Odd Rituals are dead on the field but they help mitigate gauge cost.

I would honestly only grab 1 maybe 2 Odd Rituals at the most with Cat Shadow though especially since Skull Warriors have very little life gain. You want to mainly use Return to the Underworld with Cat Shadow.

Also, there is a weighted difference with effect damage.  Effect damage is weighted as .75 and not .5. It's usually not noticeable but Bushi wanted to weigh effect damage a little "heavier" than the critical of monsters.  They wanted there to be more resources needed to be used to deal effect damage. Bushi wants this game to be about battling your opponent.  Not who can whittle down their life down to zero first.  Especially since you can burn a lot turn 0.

If effect damage was weighted the same as life (.5), it would be too easy to burn someone down. Especially since people don't use the White Dragon Shield clone or Chillax clone cards that much. That's what the above cards are used for.  They're normally used to mitigate effect damage.  The White Dragon Shield clone isn't used much because attack nullifies are better. The chillax clone is pretty useful though. It works on both effect and monster damage.  Plus in a game where cards that say "this cards attack can't be nullified" is starting to become a little more prevalent, Chillax is becoming more useful.


Drop Zone

This isn't used by every world and this is starting to be expanded upon by several worlds. In Katana World, Skull Warriors tend to use this resource the most to call back monsters.  Some use it as a measure to give your monsters more abilities. Some noticeable archetypes that do this are Blade Beasts, the new Black Dragons and the not yet released Executioners. Most worlds and archetypes consider cards in here "dead".  Meaning there's no way to grab them back to use them again.

I currently don't know if mill effects (when cards are put directly from the deck to the drop zone) are weighted any certain way.  I have to do some testing to figure that out. Unfortunately, my life is all forms of chaos right now so I can't really do it right now.


Deck

Last but not least, the deck you draw cards from.  Once you don't have no more cards in your deck, you lose the game immediately.  I've always found that rule strange but it's usually not a big deal for virtually any game.

Opposite to the milling of cards to the drop zone, I'm not sure if excavating (putting cards from drop back to the deck) has any advantageous value.  Bushi is just starting to do these effects so we'll have to wait and see.

Tuesday, September 13, 2016

4th Place Toronto Deck

4th Place Toronto Deck

I did the thing!

So now that I've caught up on things in my life, here is my deck (and side board) list from coming in 4th at Toronto:


Main Deck
Side Board

In case you guys have a hard time seeing the cards, here's the list written out:

Main Deck:

Buddy: Byakuya "Shiroyasha Mode"

Size 1:
4x Byakuya "Shiroyasha Mode"
4x Tsukikage "Kuroyasha Mode"
4x Tsukikage "SD"
3x Low-Rank Ninja, Mikazukimaru
3x Electron Ninja, Shiden

Size 2:
3x Yumi Ninja, Suiha
4x Ghoul Deity, Gojinmaru
2x Gojinmaru "Ghoul Deity Arts, Dance of Yashagami!"

Size 3:
1x INV Second Omni Demon Lord, Death Asmodai
1x Fourth Omni Fire Lord, Burn Nova

Spells:
4x Art of Body Replacement
4x Ninja Arts, Snake Gaze
4x Clear Serenity
3x Raiton, Art of Stored Electricity
3x Shinobi Scrolls
3x Katon, Blazing Armors 

Side Board:
3x Ceremony of Excorcism
3x Demon Way, Kasumienran
4x Ninja Arts, Half Kill

So as many of you can probably tell, this deck is all about drawing and searching for everything and anything.  Suiha, Shiden, Mikazukimaru and Shinobi Scrolls helps you draw a decent amount of cards per turn. In the mean time, you can regain all the gauge you burned to draw with a Clear Serenity or Raiton.

The deck still mainly focuses on the original Gojinmaru but I put in 2 of the impact monster because I would rather have a Gojinmaru on the field than none at all.  He's more of a plan B card.  Ninjas still gel the best with the original Gojinmaru.

Once you have Gojinmaru on the field (prefereably with Tsukikage "SD" in the soul), the point is to keep him on the field with Tsukikage "Kuroyasha Mode" (which is a stupid card in every way, shape and form) and stop people from doing massive attacks with Snake Gaze and Katon, Blazing Armor.

Death Asmodai is awesome for ninjas because you can respam the field with size 1's or call a Gojinmaru onto the field.  Granted, he won't have soul but it really stops people in their tracks when he just comes out of nowhere.  Asmodai also helps get your life to 5 or less for Raiton's full effect. 

Burn Nova saved my bacon a couple times during the tournament and he's not hard to call. Especially if you call Clear Serenity or Raiton in your hand (or in Shinobi Scrolls) when your opponent is declaring the attack to kill you. 

Side board thoughts:

Ceremony of Excorcism: Literally not used.  I will probably remove it in future tournaments.  I only run it for fear of someone cheesing the tournament with a Stars deck.  Stars screw over Ninjas hard.

Ninja Arts, Half-kill:  Massive help against my Shadow Shades and Fifth Omnis match up. I originally side boarded it for Raging Spirits since I can't shadow dive them.  Definitely a possible main board card but Gojinmaru does have shadow dive and all the other ninjas (except Shiden) have decent attack power to pop souls.  I only put Half-kill in against Shadow Shades because it's "technically" better than Katon, Blazing Armor in that match up.

Demon Way, Kasumienran: Originally meant as side board against Darkness Dragon World shadow dive decks.  I never played against them but I did play against a Wydar Sarkal rush deck and my opponent was smart. He link attacked me directly to beat me game 1 because he knew there was no Ninja Art card that can nullify link attacks with an open center.  I sided in the Kasumienrans to bait out his link attacks.  This card was worth its weight in gold in game 2 and 3.  Baited out 2-3 link attacks total between game 2 and 3.

Some cons of the deck:

- If the game goes on for too long, you can possibly deck yourself out.  Deck management is a little bit of an issue but it's not major.

- I wanted to fit a weapon in the deck but couldn't find space.  Water Calling Sword, Suiryu was definitely something I was thinking about but didn't have time to think about adding it.

- I like Sword Skill, Sen no Sen in the deck more than Katon, Blazing Armors (especially to bait out two monsters with penetrate link attacking your center monster) but gauge management was already intense and I couldn't afford that one extra gauge.

- This isn't as much of a con but I need to find a way to get my life to 5 or less more easily to get the full effect of Raiton.  Once Gojinmaru got on the field, I rarely go to 5 life or less.

I'm still working on another article about resources in the game.  It's in the editing phase but the tournament pulled me from that so it's delayed for about a week or two.